We had this issue while dumping one database
We added below parameter in /etc/my.cnf
innodb_strict_mode = 0
And restarted Mysql
Now mysql dump worked fine
We had this issue while dumping one database
We added below parameter in /etc/my.cnf
innodb_strict_mode = 0
And restarted Mysql
Now mysql dump worked fine
KVM based VPS was giving belolw error
“error: Unable to read from monitor: Connection reset by peer”
The fix was to disable VNC in VPS settings and start vps
which worked fine with me
root@support [/home/tin/public_html]# yum update
rpmdb: Thread/process 15537/139860640372640 failed: Thread died in Berkeley DB library
error: db3 error(-30974) from dbenv->failchk: DB_RUNRECOVERY: Fatal error, run database recovery
error: cannot open Packages index using db3 – (-30974)
error: cannot open Packages database in /var/lib/rpm
CRITICAL:yum.main:
Error: rpmdb open failed
mv /var/lib/rpm/__db* /tmp
root@support [/home/tin/public_html]# yum clean all
Loaded plugins: fastestmirror, universal-hooks
Cleaning repos: EA4 cpanel-addons-production-feed cpanel-plugins base epel extras nginx remi-php56 remi-safe updates
Cleaning up Everything
Cleaning up list of fastest mirrors
root@support [/home/tin/public_html]# yum update
Loaded plugins: fastestmirror, universal-hooks
Setting up Update Process
Error:The system experienced the following error when it attempted to install the “OWASP ModSecurity Core Rule Set V3.0” vendor: API failure: The system could not validate the new Apache configuration because httpd exited with a nonzero value. Apache produced the following error: httpd: Syntax error on line 224 of /etc/apache2/conf/httpd.conf: Syntax error on line 32 of /etc/apache2/conf.d/modsec2.conf: Syntax error on line 28 of /etc/apache2/conf.d/modsec/modsec2.cpanel.conf: Could not open configuration file /etc/apache2/conf.d/modsec_vendor_configs/OWASP/modsecurity_crs_10_setup.conf: No such file or directory
1. Manually edit /var/cpanel/modsec_cpanel_conf_datastore file with your favorite editor.
2. Removed all active configs, active vendors, disabled rules, and updates.
3. Just keep disabled rule.
4. Save the file.
5. Login to WHM
>> Home >> Security Center >> Modsecurity Vendors
>> Manage Vendors >> OWASP ModSecurity Core Rule Set
>> click +install.
6. Modsecurity rules will be installed without any issue.
$> yum install rpm-build cpio ea-apache24-mod_version
$> wget https://github.com/pagespeed/cpanel/raw/master/EA4/ea-apache24-mod_pagespeed-latest-stable.src.rpm
$> rpmbuild --rebuild ea-apache24-mod_pagespeed-latest-stable.src.rpm
$> rpm -ivh /root/rpmbuild/RPMS/x86_64/ea-apache24-mod_pagespeed*.rpm
$> /etc/init.d/httpd restartNote: if you get following error on Step 3 :
“RPM build errors:
File must begin with “/”: %{_httpd_moddir}/*.so
File must begin with “/”: %{_httpd_modconfdir}/*.conf”
Just create a file named “macros.apache2” in ‘/etc/rpm/ directory and paste the below content into that and then restart from step 3.
%_httpd_mmn 20120211×8664
%_httpd_apxs /usr/bin/apxs
%_httpd_dir /etc/apache2
%_httpd_bindir %{_httpd_dir}/bin
%_httpd_modconfdir %{_httpd_dir}/conf.modules.d
%_httpd_confdir %{_httpd_dir}/conf.d
%_httpd_contentdir /usr/share/apache2
%_httpd_moddir /usr/lib64/apache2/modules
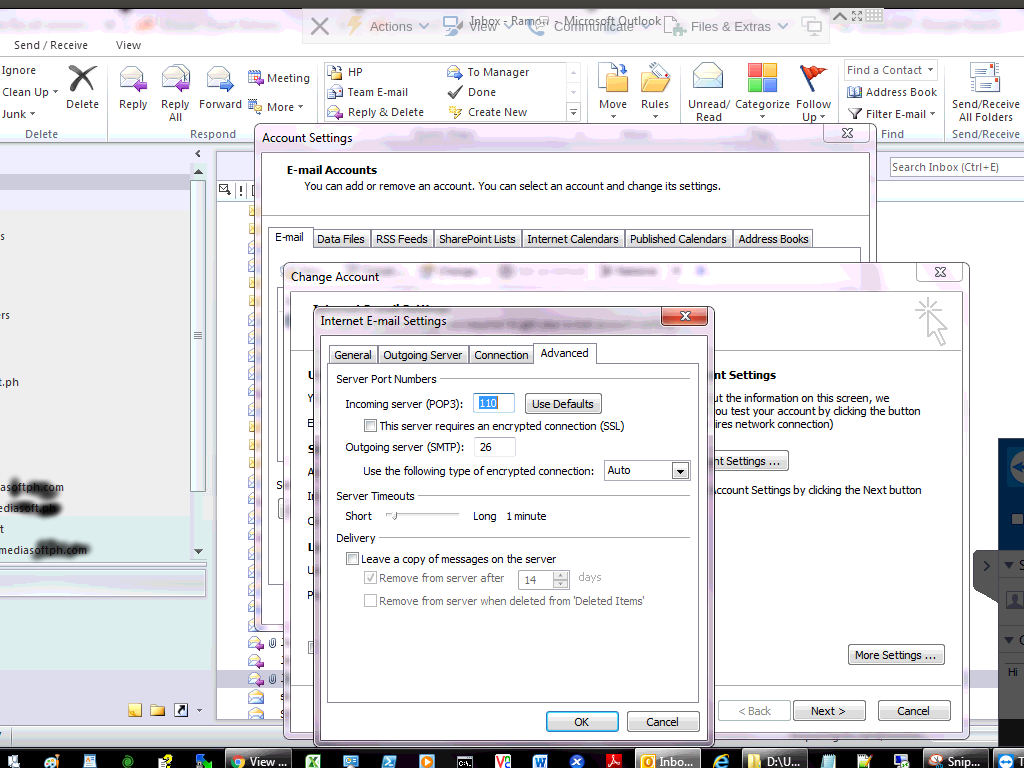
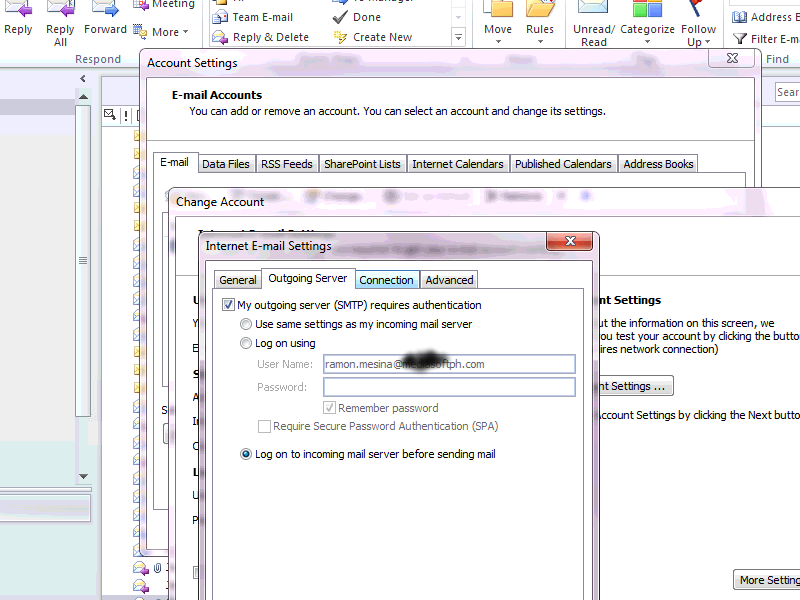
Attached screenshot is the right way to setup outlook 2007/2010 in Centos 7 and cPanel
This was a new issue which we came across while creating a Wimdows OS on KVM platform on Virtualizor
After several tries of creatng a VPS, We were able to make headway on this.
Scroll to bottom to find option Advanced Options
Here you will find option Enable virtio which is already check marked
Uncheck the Enable virtio option and save
You should be able to see disk space now while creating Windows VPS
Also in network settings select Virtual Network Interface Type select Realteck
This will make network start after the VPS in installed
if you get the below error
Access Denied
Unable to establish a PHP session.
The account must be able to write to the php session directory and must not exceed the assigned disk quota.
If
you believe that this is in error or inadvertent, contact your system
administrator and ask them to review your server settings.
Please check using following step
2. Check the permission and ownership of /home/$user/tmp folder. Set ownership as $user.
# chown $user:$user /home/$user/tmp
3. Set permission of the tmp folder to 755.
#chmod -R 755 /home/$user/tmp
4. Test now to see if PHPMyAdmin is working fine now…if the answer is no, go to next step….
5.Check to see if there is a file like /var/cpanel/overquota/blocks_$user and removed it.
6. rm /var/cpanel/overquota/blocks_$user
We had a issue in one of the virtualizor node
Where the server on rebooting the KVM VM were not starting
With error message being
error: Failed to create domain from /etc/libvirt/qemu/
error: Cannot get interface MTU on ‘viifbr0’: No such device
ON checking around found the issue with virtnetwork
Below command fixed the issue
service virtnetwork start
~]# service virtnetwork start
Bringing up viifbr0 – OK
Waiting for 10 seconds…1…2…3…4…5…6…7…8…9…10
Internet connectivity check successful viifbr0 – OK
Below are the commands which are to be used in centos 7 to open port 80

[root@onlinesupport ~]# firewall-cmd --permanent --zone=public --add-port=80/tcp success

[root@onlinesupport]# firewall-cmd --reload